This describes the basic operation of the Kenwood handheld radio distributed for use by MRC participants. The format is a step-by-step approach useful in a classroom.
Before using the radio attach the antenna if it is not already in place. You can damage the radio if you transmit without an antenna attached. Always have the antenna on the radio if the battery pack is attached. If the battery pack is not attached attach it as well.
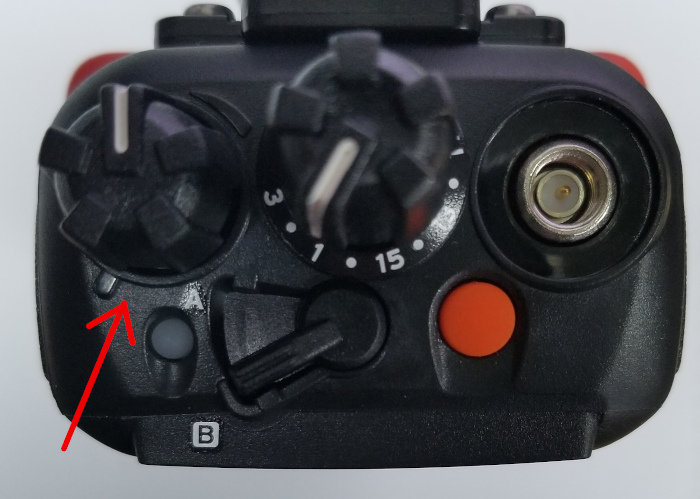
The small round knob on the top of the radio is used to turn on the radio and adjust the volume. Rotate the knob clockwise so that the white line on the knob is pointing toward the back of the radio. The radio will "beep" once when you turn it on and the display should briefly show the word "Kenwood" and then information about the radio channel setting. If the radio does not do this check that the battery pack is properly installed and if so remove it and check that it contains fresh batteries. If the radio does not power on seek assistance from the MRC leader.
In this image the red arrow is pointing at the power switch. The switch is on as indicated by the white line pointing at the back of the radio. NOTE: In order to get a good photo of the top of the radio the antenna has been removed. Your radio should always have an antenna attached before turning the radio on!
With the volume set in this position you should be able to hear the radio in a reasonably quiet environment. If outdoors on a windy day you may want the volume higher. Before proceeding adjust the volume to a comfortable level.
The left side of the radio has two buttons below the push to talk switch. The button immediately below the push to talk switch will open the radio squelch. This allows you to hear static and determine the present volume setting.
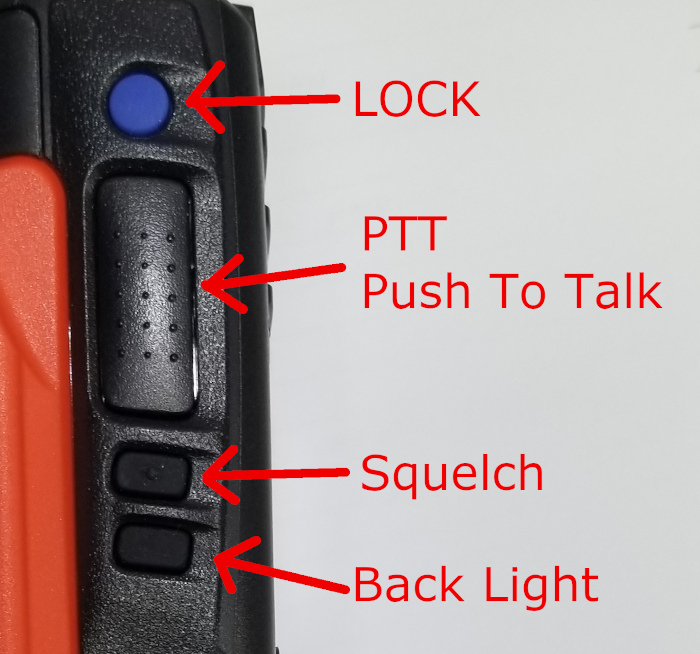
Press the squelch button and while holding this button down rotate the volume knob clockwise for more volume or counter-clockwise for less volume.
The radio has 16 channels controlled by the large knob on top of the radio. The odd numbered channels (1, 3, 5, 7 and so on) are indicated with the channel numbers. Even numbered channels are indicated by a dot between the odd channel numbers.
Rotate the channel knob counter clockwise so the white line is pointing to the number 1. This sets the radio to channel 1 which is "MRC Command", the Cannon Beach MRC repeater.
The radio has 12 banks of channels. These are also called zones. Cannon Beach uses channels in zone 3. The display on the radio has three lines of text which indicate:
The zone is set using the up and down arrow on the square pad on the front of the radio directly below the display.

The up arrow will advance to the next higher numbered zone. The down arrow will advance to the next lower numbered zone.
Use the up arrow key to change the zone. Continue pressing the up arrow key until the top line of text is "Zn 3".
The text on the display should be:
Zn 3
Cannon Beach MRC
CB MRC CMD
If the text does not look like the photo above check that the radio is set to channel 1 (top knob) and the radio is set to zone 3 (front up arrow). If you show "Zn 3" and the radio display does not have the same text as the photo contact the MRC leader.
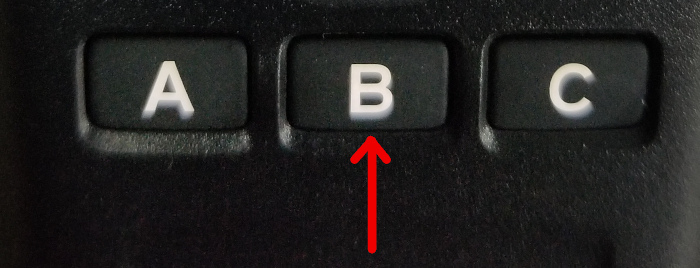
The blue button on the left side of the radio will lock the keypad. Once you have set your radio to the desired zone you should activate the keypad lock to prevent accidentally changing the radio setting. Push the button several times while observing the icons at the top of the display. A symbol of a key will appear to indicate that the keypad is locked.
This is the display when the keypad is unlocked:
This is the display when the keypad is locked:
![]()
For normal use set the radio to the desired zone and then lock the keypad. This will prevent accidentally touching a button on the keypad and changing a setting.
To continue, make sure the keypad is unlocked. If the key icon appears in the display as shown above press the blue button on the left side of the radio so that the key icon disappears indicating that the keypad is unlocked.
The "A" keypad on the front panels activates the "talk around" setting.
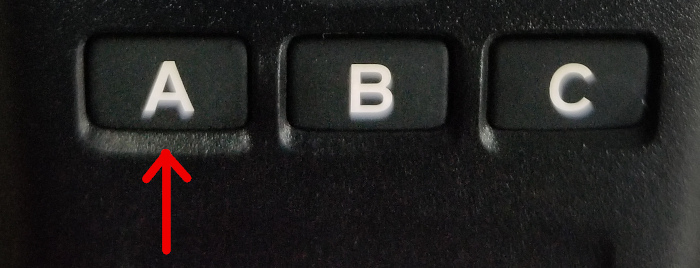
Press this key several times while watching the icons displayed above the text on the screen. A small white symbol of a radio indicates that the radio is in "talk around" mode.
![]()
You do not want to have the radio in this mode. After you have set the correct zone and channel and locked the keypad check the display to make sure this icon is not shown. If it does appear, unlock the keypad (blue button) and press the "A" key one time to disable "talk around" mode. Then lock the keypad again.
Explanation: This mode will change the behavior when on the repeater channel so that you transmit on the repeater output instead of the repeater input. You will still hear the repeater output and people near you will hear you talking on the repeater output frequency. But people far from you will not hear you. This will cause lots of confusion. It is not necessary to understand the details. Just be cautions that you do not accidentally have the radio in this mode.
Disable "talk around" mode before continuing to use the radio if it is now set.Rotate the channel selection knob to channels 2, 3, 4, and 5 while watching the display. You will see the channel names show "OHA OPS" channels 1 through 4. For example this is OPS channel 2:
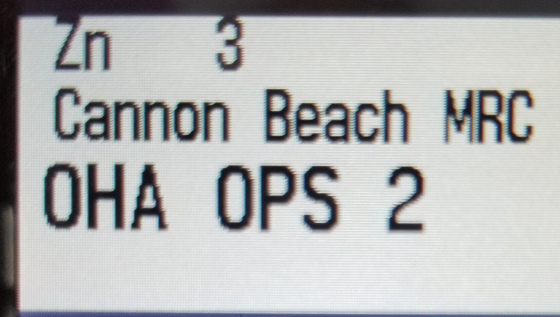
These are the Oregon Health Authority Operations channels (OHA OPS). These are simplex channels which mean that each radio communicates with another radio without using a repeater. You will normally use the repeater channel and these four operations channels. The MRC leader or your team leader will tell you what channel you should be using.
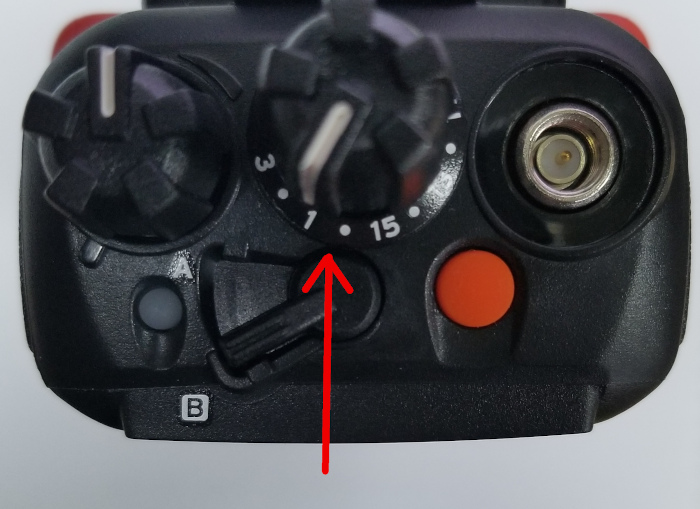
The radio is able to transmit at two power levels. This is controlled by an "A / B" switch on the top of the radio.
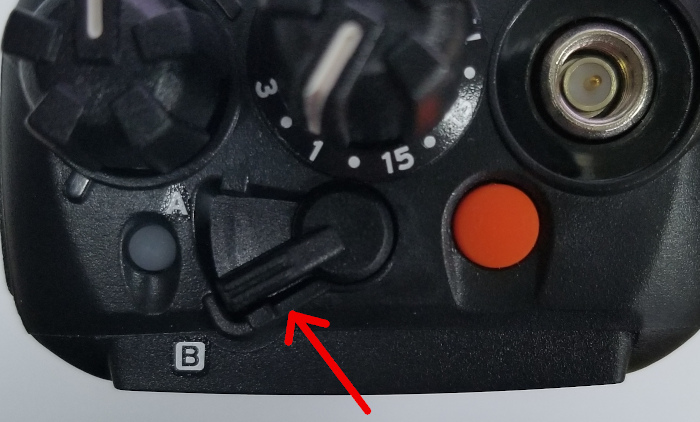
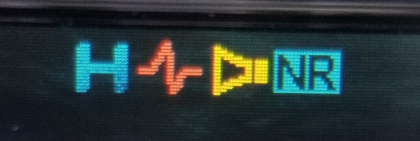
Setting "A" is high power. Setting "B" is low power. The front panel icons will show "H" or "L" to indicate the power level. The letter "H" will be displayed in blue when in high power. The letter "L" will be displayed in yellow when in low power.
After using the radio for a while in Cannon Beach you will learn how far you can communicate at low power. Outdoors over a short distance may work at low power while at a longer distance and indoors may require higher power. You can start at high power and ask for a radio reception report. Then switch to low power and ask for another reception report. The power setting does not change how well you hear someone else. It will only change how someone hears you. It is always good radio practice to use the least amount of power necessary for good communication. If you are transmitting a lot, such as acting as net control, using low power will make the batteries last longer. You will normally be listening much more than transmitting so the power setting should not change battery life for most users.
The front panel button marked "B" will let you check the battery level. When you press this button the radio will beep up to four times and then red light on top of the radio will blink. Four tones means that the battery pack is at full voltage. As the batteries are used the number of beeps will decrease. You should replace the batteries before they are fully discharged.
Cannon Beach MRC team members will normally use one of the first 5 channels. Note that channels 1 and 16 are both the same channel which is used for the repeater. This feature allows you to rotate the channel selector dial fully clockwise or counter-clockwise and select the repeater, The repeater is intended to allow communication over all of Cannon Beach and is the most likely channel to be used for communications net.
Channels 2 through 4 are called "simplex" and allow for local communications in which a one radio communications directly with other radios set to the same channel. This would allow separate teams to work together and communicate within a team.
| Channel # | Display | Channel Name | Use |
| 1 | CB MRC CMD | Medical Reserve Corp Command | Repeater - city wide |
| 2 | OHA OPS 1 | Oregon Health Authority Operations 1 | Simplex |
| 3 | OHA OPS 2 | Oregon Health Authority Operations 2 | Simplex |
| 4 | OHA OPS 3 | Oregon Health Authority Operations 3 | Simplex |
| 5 | OHA OPS 4 | Oregon Health Authority Operations 4 | Simplex |
Look to the MRC leader or your team lead to decide what channel you should be using. Each activity that takes place should have a communication plan to tell you what channel you will use.
Using another zone or channel will be done by invitation. Channels 6 through 8 are "HEAR" channels. These are Hospital Emergency Administrative Radio channels. If you were requested to communicate directly with a hospital you might be asked to use one of these channels. All of the MRC radios have been programed with the same zones and channels. This allows the radios to be used anywhere within a wide area by changing the zone. You should not be operating on anything but zone 3 and one of the first 5 channels unless specifically told to do so.